
Towing & hookup guide
Hitch Up. Head Out.
Everything you need to safely tow your DoorSky teardrop camper — from vehicle requirements to the 10-point pre-departure checklist.
Self-Hitch Made Simple
The Timberleaf Classic is one of the lightest, most towable trailers on the market. At roughly 1,800 lbs dry weight, it can be towed by most modern SUVs, crossovers, and trucks — no special license or commercial vehicle required.
This guide walks you through everything: verifying your vehicle's tow rating, attaching the hitch, running the safety chains and electrical, and the pre-departure checks that make every trip worry-free. Watch the videos alongside each step for a visual walkthrough.
Vehicle Requirements
Confirm your tow vehicle meets these specs before your pickup appointment.
Minimum 2,000 lb tow rating
RequiredThe Timberleaf Classic weighs approximately 1,800 lbs dry. Your vehicle's Gross Trailer Weight (GTW) rating — found in your owner's manual or door jamb sticker — must exceed this. We recommend a vehicle rated for at least 2,000 lbs to maintain a comfortable safety margin.
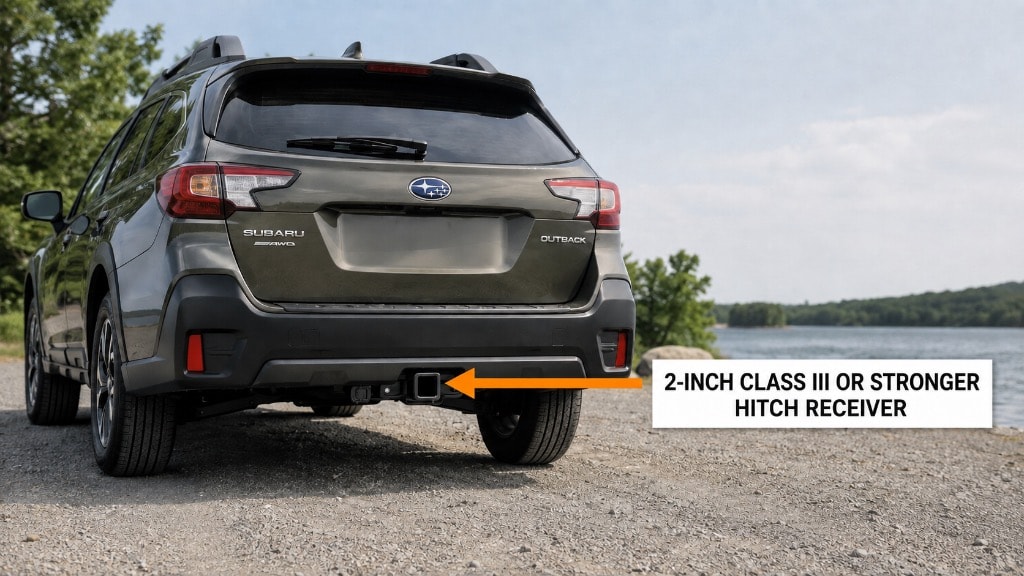
2 inch class III or stronger receiver hitch required
RequiredThe Timberleaf Classic requires a Class II (2" receiver) hitch. A Class I (1-1/4" receiver) is not sufficient. Class III and above also work fine. The hitch ball and mount must be rated for at least 2,000 lbs GTW and 200 lbs tongue weight.
Max Coupler sleeve included — no ball mount needed
RequiredThe trailer uses a Max Coupler system. A Max Coupler sleeve is provided with your rental — it inserts directly into your Class II (2") receiver hitch, so you can show up without a ball mount or tongue installed. Watch the required Max Coupler instructional videos before your pickup appointment so you are familiar with the connection process.
Required viewing before pickup
Tongue weight capacity
The Timberleaf Classic has approximately 180 lbs of tongue weight. Check your owner's manual — most vehicles rated for 2,000+ lbs towing handle this easily.
Adequate rear visibility
Wisconsin law requires that you can see at least 200 feet behind your vehicle. The teardrop's narrow profile (60" wide) typically stays within standard side mirrors. If your vehicle's mirrors don't provide adequate rearward visibility, clip-on towing mirror extensions are required.
Electrical connector — 7-pin round or 4-pin flat
RequiredThe trailer uses a 7-pin round RV connector (optimal as it charges the on board battery) or 4-pin flat connector for full brake and lighting function. Most trucks have one built in. I
If your vehicle has both connector types, use only one — do not plug in both at the same time.
10-Step Hookup Sequence
Follow these steps in order every time. Watch the video walkthrough before your first pickup.
Required viewing before pickup
Position your vehicle
Back your vehicle slowly until the Max Coupler receiver is directly in front of the trailer's coupler. Use a spotter if available. Leave 6–12 inches of clearance.
Tip: Use a straight driveway or flat surface for your first hookup — it makes alignment much easier.
Insert the Max Coupler sleeve
Slide the provided Max Coupler sleeve into your 2" receiver hitch. Secure it with the hitch pin and clip. The sleeve must be fully seated before proceeding.
Tip: The sleeve should slide in smoothly. If it binds, check that your receiver is clear of debris.
Raise the trailer tongue jack
Crank the tongue jack to raise the coupler slightly above the Max Coupler sleeve height. This gives you clearance to back under the coupler.
Tip: Don't raise it more than necessary — a few inches of clearance is all you need.
Back under the coupler
Slowly back your vehicle until the Max Coupler sleeve is centered under the trailer coupler. Have a spotter watch the alignment from the side.
Tip: Go slow — an inch at a time near the end. Bumping the coupler can knock the trailer off its jack stands.
Lower the coupler onto the sleeve
Crank the tongue jack down until the trailer coupler seats fully onto the Max Coupler sleeve. The coupler latch should engage with an audible click.
Tip: Give the trailer a firm side-to-side shake to confirm the coupler is fully locked before removing the jack.
Connect the electrical
Plug the trailer's 7-pin round RV connector into your vehicle's trailer socket. This activates the electric trailer brakes as well as all lights. If using a 4-pin adapter, — drive with extra caution. Route the cord so it won't drag or catch on turns. Secure any excess cord with the provided hook.
Tip: Plug in before the next step so you can test lights without walking back and forth.
Attach the safety chains
Cross the two safety chains under the tongue in an X pattern and attach them to your vehicle's chain hooks or receiver loops. Crossed chains cradle the tongue if the coupler ever separates.
Tip: Chains should have just enough slack to allow turns without dragging on the ground.
Retract the tongue jack
Crank the tongue jack fully up and secure it in the travel position. A dragging jack can catch on road debris or high-crown roads. rotate it 90 degrees and place cross pin in place for travel
Tip: Some jacks have a pin or latch to lock them in the retracted position — use it.
Test all lights
Have a helper stand behind the trailer while you test brake lights, turn signals (both sides), and running lights. Fix any issues before departing.
Tip: If any light fails, check the 7-pin round RV plug connection first — a loose plug is the most common cause.
Final walk-around
Do one final walk-around: hitch pin clipped, chains crossed and attached, electrical connected, jack retracted, all doors latched, tires inflated. You're ready to go.
Tip: Take a photo of your hookup before every trip — it takes 10 seconds and gives you a reference if anything looks off later.
Driving with a Trailer
A few adjustments to your driving habits make towing safe and stress-free.
Keep it under 65 mph
The Timberleaf is rated for highway speeds, but trailer sway risk increases above 65 mph. Stick to 55–60 mph on open highways for the smoothest, safest tow.
Sway happens — stay calm
If the trailer begins to sway, ease off the gas gradually. Do not brake hard or steer into the sway. Let the trailer straighten itself as speed drops.
Wide turns
The trailer tracks inside your vehicle's turning radius. Take corners wider than normal, especially in parking lots and at intersections, to avoid clipping curbs.
Increase following distance
Your stopping distance increases significantly with a trailer. Maintain at least 4–5 seconds of following distance and begin braking earlier than you normally would.
Backing up
To back left, turn your steering wheel left. To back right, turn right. Go slowly and use small steering inputs. Having a spotter makes backing into a campsite much easier.
Wind and passing trucks
Large trucks and strong crosswinds create buffeting. Grip the wheel firmly, ease off the gas slightly, and let the trailer stabilize. Anticipate gusts on open stretches and bridges.
Unhitching & Leveling at Camp
Arrive, unhitch, and get settled in minutes.
Unhitching walkthrough video
A step-by-step video for unhitching and leveling at your campsite.
Choose a level spot
Park on the most level ground available. Side-to-side level matters most for sleeping comfort. Front-to-back level affects the galley and door swing.
Chock the wheels
Place the provided wheel chocks on both sides of one tire before unhitching. This prevents the trailer from rolling while you work.
Lower the tongue jack
Crank the tongue jack down until it contacts the ground and takes weight off the coupler. Continue until the coupler lifts slightly off the Max Coupler sleeve.
Disconnect electrical and chains
Unplug the 7-pin connector and stow the cord on the trailer hook. Remove both safety chains and hang them on the trailer's chain hooks.
Release the coupler and drive forward
Release the Max Coupler latch, then slowly pull your vehicle forward until clear of the trailer tongue. Have a spotter watch the clearance.
Level the trailer
Use the tongue jack and the provided leveling blocks under the tires to get the trailer level side-to-side and front-to-back. A small bubble level on the countertop works great for fine-tuning.
Safety Reminders
Never exceed your vehicle's rated tow capacity or tongue weight limit.
Inspect the coupler connection and safety chains before every departure, even short moves.
Check tire pressure on both the tow vehicle and trailer before each trip.
Test all trailer lights every time you hook up — bulbs can fail between trips.
Keep emergency contact info and the DoorSky roadside assistance number accessible during your trip.
If you hear or feel anything unusual while driving, pull over safely and inspect before continuing.
Questions Before You Go?
We're happy to walk you through the hookup process at pickup, answer questions over the phone, or point you to the right resources. Don't hesitate to reach out.